REVIEW · SEOUL
Seoul DMZ Tour with 3rd Tunnel and Red Suspension Bridge
Book on Viator →Operated by I Love Seoul Tour · Bookable on Viator
A DMZ day trip makes the Korean War feel real fast. This tour strings together the key memorial spots near the Demilitarized Zone, plus a rare look inside the 3rd Tunnel and a scenic, symbolic red suspension bridge climb. I especially like how the day mixes meaning (Imjingak and Mangbaedan) with the physical experience of walking through the tunnel and standing at Dora. Another big win is that you get a guided format with included admission and transport, so you spend your energy where it matters, not figuring out logistics.
The main drawback is effort. The 3rd Tunnel is narrow and low, so you’ll crouch and stoop for parts of it, and the bridge approach includes a climb that can feel steep after a long bus ride.
In This Review
- Key Highlights You’ll Care About
- What You’re Really Seeing on a Seoul DMZ Day Trip
- Price and Logistics: Where the Day’s Time Actually Goes
- Meeting in Myeong-dong: The Easy Part You Shouldn’t Rush
- Imjingak Pyeonghoa-Nuri Park: War Memory With a Unification Message
- Mangbaedan: A Short Stop With a Clear Human Focus
- The 3rd Tunnel: Narrow, Cold, and Hard to Forget
- Dora Observatory: Cross-Border Views and the Weather Factor
- Gamaksan Chulleong Bridge: The Red Suspension Bridge and the Battle of Solma-ri
- How Much Walking and Effort You Should Plan For
- Who This Tour Is Best For (and Who Should Rethink It)
- Meals, Snacks, and Your Small-Day Survival Plan
- Should You Book This Seoul DMZ Tour With the 3rd Tunnel and Red Suspension Bridge?
- FAQ
- Is a passport required for this tour?
- Where do I meet, and where do I end the tour?
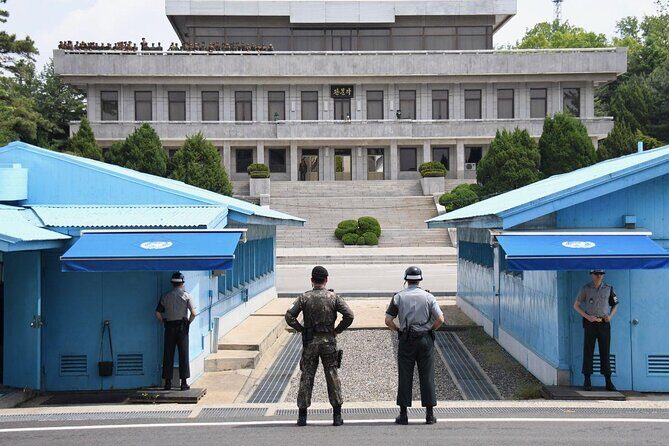
- Is the Joint Security Area (JSA) included?
- What’s included in the ticket price?
- How long is the tour and what should I expect physically?
- What should I bring or wear?
Key Highlights You’ll Care About
- 3rd Tunnel size and feel: 1,635m long, with about 2m width and 2m height, which means you’ll be walking stooped.
- Dora Observatory views depend on weather: clearer days help you spot more across the border.
- Imjingak Park tells the unification story through monuments: it’s built with the hope of eventual reunification.
- Mangbaedan is brief but specific: it’s tied to people who left family behind and visit on New Year’s Day.
- Gamaksan Chulleong Bridge adds a war-to-landscape contrast: a red suspension bridge connected to the Battle of Solma-ri.
- No JSA stop: you’ll get DMZ-adjacent sites without visiting the Joint Security Area.
What You’re Really Seeing on a Seoul DMZ Day Trip
You’re not going to a museum where everything is safe, flat, and labeled for comfort. This is a line on a map that still shapes daily life, and the sites on this tour are chosen for how they explain that reality from different angles.
You start with places like Imjingak and Mangbaedan, which focus on memory and the human side of separation. Then you shift to the physical: the 3rd Tunnel is built for a specific purpose and designed to be walked by people visiting the past. Finally, you end with high ground at Dora Observatory and a climb to the red suspension bridge at Gamaksan Chulleong Bridge, where the views across the border can change with fog, haze, or clear air.
If you’re doing this from Seoul, the biggest value is the “many stops, one day” structure. At $45 per person with transport and admissions included, it’s a way to compress a lot of DMZ-related sightseeing into an 8-hour window without needing a car or separate tickets for each site.
You can also read our reviews of more tours and experiences in Seoul.
Price and Logistics: Where the Day’s Time Actually Goes
At $45, the math works because admission tickets are included and you’re in an air-conditioned vehicle for most of the day. You’re also not dealing with the common trap of a tour that looks cheap but adds costly paid attractions on top. Here, the paid elements are baked in: 3rd Tunnel and Dora Observatory admission are included, and the day is structured around fixed stops.
Your biggest time-drain is distance. The 3rd Tunnel is about 52km from Seoul, so you’re starting early enough (or at least traveling long enough) to make the most of it. The day runs about 8 hours, and you’ll return back to the Myeong-dong area.
Do note what is not included. There’s no hotel pickup/drop-off, so plan to meet at Myeong-dong subway station. Meals aren’t included either, so bring snacks and water. One guide-led tip you can take seriously from real experiences: there may not be a long, sit-down lunch break, so having your own bite to keep your energy stable helps.
Also, because DMZ activities are handled by the military, the trip may be canceled without prior notice. That’s not unique to this operator—it’s the reality of the area.
Meeting in Myeong-dong: The Easy Part You Shouldn’t Rush
This tour starts and ends in Myeong-dong (meet at Myeong-dong subway station, finish back in the same general area). Because there’s no hotel pickup, I’d treat Myeong-dong as the anchor. Arrive a bit early so you’re not sprinting through crowds while your day schedule is already moving.
A current valid passport is required on the day of travel. Even if you’ve traveled in Korea before, don’t assume anything. The DMZ is paperwork-heavy compared to typical sightseeing.
Wear choices matter more than you’d think. The tour strongly recommends avoiding flip-flops, slippers, or shoes with heels. That’s not just about comfort—your feet will be dealing with stairs and slopes, and the tunnel experience demands stability. If you’re someone who hates “tour shoes,” go for supportive walking sneakers instead.
Finally, the tour uses a mobile ticket, which is convenient if your phone battery is stable. Bring a charger or an extra power bank if you can.
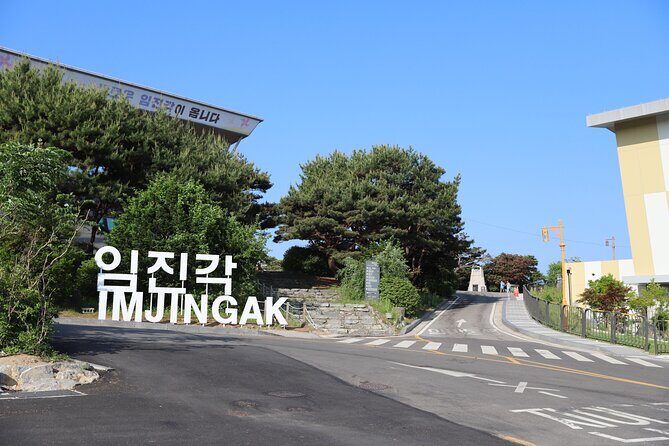
Imjingak Pyeonghoa-Nuri Park: War Memory With a Unification Message
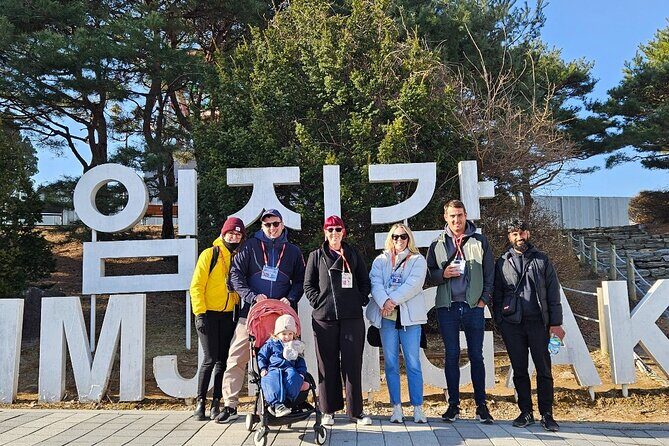
Stop 1: Imjingak Pyeonghoa-Nuri Park is where the day starts to feel more than sightseeing. The park was built in 1972 with the hope that reunification would become possible, and that purpose shows up through the setting and the monuments.
You’ll have about 30 minutes here, and it’s long enough to take in the overall layout without feeling rushed. Imjingak is known for DMZ-related themes, and you can see elements like Mangbaedan-linked grounds and nearby memorial-style features (including Bridge of Freedom and Dokgae Bridge, which was blown up during the war and reconstructed).
One reason I like starting here is that it gives you a framework for the rest of the day. When you later stand at Dora Observatory or walk the 3rd Tunnel, you’re not just looking at “war stuff.” You’re seeing how separation is explained through space, monuments, and the idea of eventual return.
Potential drawback: because it’s the first stop, your energy matters. If you’re running late or skipping breakfast, you may feel it later when you have the tunnel and the bridge approach. Use Imjingak to get your bearings.
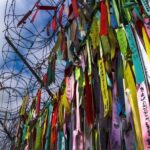
Mangbaedan: A Short Stop With a Clear Human Focus
Stop 2: Mangbaedan is brief—about 15 minutes—and that’s part of its strength. It’s connected to a very specific practice: people who left their families in North visit on New Year’s Day.
This stop doesn’t try to overload you with details. Instead, it lands a clear idea: history isn’t just events. It’s ongoing loss, ongoing waiting, and ongoing routines shaped by politics.
If you’re doing the tour on a day when you feel emotionally drained by heavy topics, Mangbaedan can actually be a relief. It’s quieter than the tunnel and Dora’s viewpoint, and it helps you remember that the DMZ is about real people, not just strategy.
Time tip: because the stop is short, don’t spend it standing at one spot. Walk the area at a normal pace, read what you can, then move on before you start feeling like you’ve “seen enough” before you’ve actually earned the later experiences.
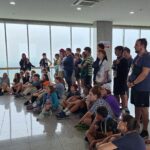
The 3rd Tunnel: Narrow, Cold, and Hard to Forget
Stop 3: The 3rd Tunnel is the physical center of the day. It was discovered by South Korea in 1978, and it stretches 1,635m long, with about 2m in both width and height. That dimension is why the tunnel changes your body, not just your mind.
You’ll have around 40 minutes total here, but remember: time inside feels longer because your pace slows. The ceiling is low enough that people end up walking stooped for parts of the tunnel. In real experience, visitors describe the tunnel as steep and challenging, with safety gear provided and a noticeable return climb.
From the height limits, you can predict what it will feel like even before you go in:
- you’ll likely keep your head down to avoid hitting the ceiling
- you’ll move slower than normal walking
- your shoulders and core will do work for 1, tunnel section and then again on the way out
One review-style detail worth taking seriously: the tunnel experience can be strenuous because it includes both descent and ascent, and some visitors report the ceiling being around 1.7 meters in the low sections. You don’t need to be an athlete, but you do need to be comfortable with bending and exertion.
If you’re claustrophobic, think hard about whether “narrow and low” is something you want today. If you’re okay with challenging conditions, this is the stop that tends to give people that I-can’t-believe-I’m-here feeling.
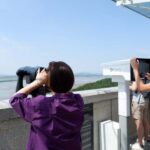
Dora Observatory: Cross-Border Views and the Weather Factor
Stop 4: Dora Observatory is where you look outward instead of inward. You’ll spend about 30 minutes here, and the admission is included.
From Dora, you can overlook North Korea and specific locations such as Gaeseong, Songaksan, the Kim Il-Sung Statue, and Cooperation Farm (Geumamgol). There’s also the possibility—depending on conditions—to see activity across the border, though it’s not something you can count on.
The key detail I’d plan around is weather. Views are weather dependent, and clear days help you see more detail without haze. If the day turns gray or humid, you might still enjoy the significance and context, but don’t expect miracles.
This stop is powerful because it connects distance to meaning. You can stand in the South, on a designated observation point, and feel how close the world is while also knowing how separated daily life remains.
Practical note: since your time here is fixed, dress for outdoor comfort. You’ll want to be able to stand and look without rushing back inside.
Gamaksan Chulleong Bridge: The Red Suspension Bridge and the Battle of Solma-ri
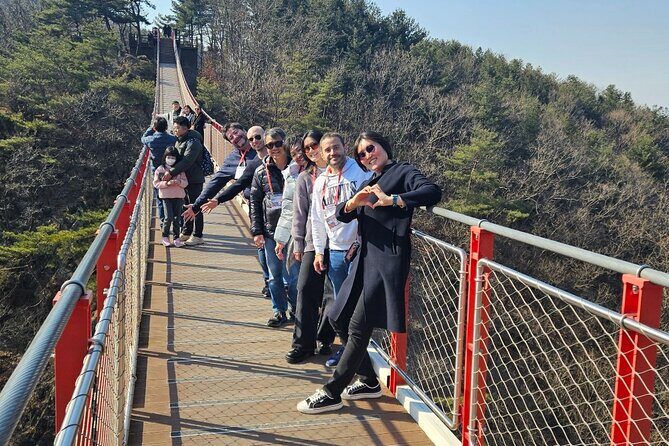
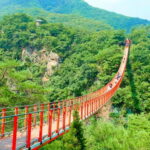
Stop 5: Gamaksan Chulleong Bridge is the day’s scenic closer, with a strong historical link. This is a suspension bridge that runs about 150m long and 1.5m wide, located in Solma-ri—the setting for the Battle of Solma-ri, also known as the Battle of Gloster Hill, in 1951.
You’ll have about 1 hour here, and that’s enough to cross, pause for photos, and take in the approach—though the approach is part of the point. Multiple experiences describe the climb to the bridge starting from the road as steep. If you’ve already done the tunnel, plan for tired legs.
What I like about this stop is that it shifts the emotional tone without skipping history. You’re not ignoring the war; you’re seeing how the land and the memory sit together. The bridge becomes a physical route over a setting tied to conflict, which adds weight to the views.
If you want a simple self-check: if you’re comfortable with uphill walking, you’ll probably find this stop enjoyable rather than just “another stop.”
How Much Walking and Effort You Should Plan For
This is not a sit-and-scroll type of tour. The itinerary has enough movement that I’d call it moderate-to-active.
Here’s the effort you’re likely facing:
- long drive time from Seoul to the 52km-distant tunnel area
- a tunnel walk where the height restrictions mean you’ll be stooping
- an outdoor bridge stop with an approach that can feel steep
- overall pacing through multiple fixed sites in roughly 8 hours
The tour recommends a moderate physical fitness level, and I agree with that framing. If you’ve got knee issues or you struggle with bending, the 3rd Tunnel is the part to consider most carefully.
Footwear is a big deal. The tour tells you not to wear flip-flops or heels for a reason. When you’re tired, good traction matters.
Weather matters too. Dora’s cross-border visibility changes with atmospheric conditions, and outdoor walking to the bridge depends on your comfort with the elements. If you’re sensitive to cold, plan for the tunnel environment feeling cooler than the bus.
Who This Tour Is Best For (and Who Should Rethink It)
This is a great fit if you want an organized DMZ day that gives you both context and a real on-the-ground experience. I especially think it works for:
- people who like history but also want a physical component (the tunnel walk)
- first-time visitors who don’t want to plan separate transport for each site
- travelers who appreciate a guide explaining what each stop means, not just reading signs
The guidance quality can make a big difference. Names like Stella, Mama Winnie, Leo, Grace, Kenny, and Thomas show up in the best-known guide feedback patterns, and those guides are repeatedly praised for keeping the day organized and making the sites feel understandable and respectful.
I’d rethink the tour if:
- you have strong claustrophobia or dread narrow spaces (the tunnel’s height constraints matter)
- you can’t manage crouching/stooping and a steep-feeling return effort
- you want long, relaxed breaks. This day is structured and active, not slow
Meals, Snacks, and Your Small-Day Survival Plan
Since meals and beverages aren’t included, don’t rely on finding food at the perfect moment. The day may not have a big official lunch break, so the smartest move is to treat snacks as part of the plan.
Bring:
- water (or buy on the way, if needed)
- a few non-messy snacks you can eat quickly
- something salty or sweet to keep energy stable for the tunnel and bridge
Also bring a light layer. Even when the weather outside feels warm, the tunnel environment can feel cooler. And if you want photos, keep your phone grip secure and your power bank handy.
Should You Book This Seoul DMZ Tour With the 3rd Tunnel and Red Suspension Bridge?
Yes, if you’re ready for a meaningful, structured day that mixes memorials with an unforgettable physical experience. The value is strong at $45 because admissions and transport are included, and you get five major stops tied to the Korean War and the DMZ story. The 3rd Tunnel and Dora Observatory are the big draws, and the red suspension bridge gives you a final historical viewpoint plus real scenery.
If you’re booking, make your decision based on effort and comfort, not just curiosity. Wear solid shoes, pack snacks, and treat the tunnel as the main test of your fitness and comfort level. If that sounds manageable, you’ll likely come away feeling like the DMZ isn’t just something on a map—it’s something you stood next to.
FAQ
Is a passport required for this tour?
Yes. A current valid passport is required on the day of travel.
Where do I meet, and where do I end the tour?
You start at Myeong-dong subway station and the tour ends back in the Myeong-dong area.
Is the Joint Security Area (JSA) included?
No. This tour does not include a visit to the Joint Security Area (JSA).
What’s included in the ticket price?
The tour includes air-conditioned vehicle, admission tickets, and a professional tour guide. Meals and beverages are not included.
How long is the tour and what should I expect physically?
The duration is about 8 hours. The tour notes that you should have a moderate physical fitness level, especially for the 3rd Tunnel and the bridge approach.
What should I bring or wear?
Bring snacks and drinks to boost energy, and wear practical shoes. The tour specifically recommends avoiding flip-flops, slippers, and shoes with heels.
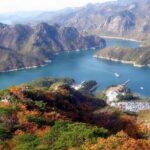
![[Perfect Private Tour] Nami island, Petite France and Organic Strawberry Farm - Nami Island in Your Own Time: Nature, Walks, and Photo Stops](https://7.seoulescapes.com/wp-content/uploads/perfect-private-tour-nami-island-petite-france-and-organic-strawberry-farm.jpg)